


|
THE VeloSoleX S 3800 has a Gurtner 6,5 LI Carburettor with a Carburettor Venturi Diameter of 6.5 mm. To enable the engine to achieve speeds over 4000 RPM, the Carburettor Venturi Diameter can be increased up to a maximum of 8 mm and a larger Main Jet of up to 0.6 mm diameter (equivalent to a 44 Main Jet) so that the mixture is rich enough at high RPM (the standard 28 Main Jet has a flow-rate of only 28 cc [cm³] per minute with a 0.48 mm diameter hole). The need to have the correct size Main Jet (or Variable Main Jet setting) is very important at high speeds, otherwise there is a possibility that the mixture will lean out (weaken) causing overheating with the risk of Piston Crown and Spark Plug damage. A useful tool when drilling out the Main Jet is the Jet Micrometer shown here:
In a basic carburettor such as the Gurtner 6,5 LI Carburettor, increasing the Carburettor Venturi Diameter will cause a loss of Venturi Signal at the Venturi (less depression) with a loss of fuel metering accuracy across the whole RPM range resulting in poorer fuel economy and a reduction in low-RPM torque needed for climbing hills. Since the VeloSoleX S 3800 already has a limited low-RPM torque for climbing hills it is NOT RECOMMENDED to increase the Carburettor Venturi Diameter. For those who are keen to experiment, an increase of Carburettor Venturi Diameter from 6.5 mm to 7 mm is described below: |
||
|
|
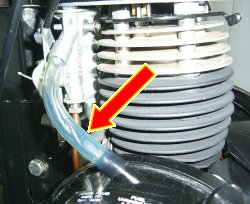
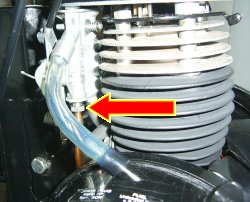
1. Remove the Fuel Return Pipe between fuel tank and carburettor. |
|
|
|
2. Unscrew a 9 mm Bolt & Washer and remove the black Air Filter Housing Cover. |
|
|
|
3. Remove the aluminum Air Filter Housing Base together with the black Rubber Washer underneath. |
|
|
|
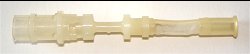
4. Remove the white plastic Carburettor Fuel Filter. |
|
|
|
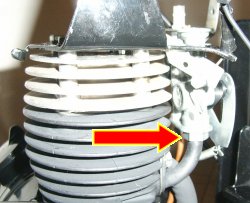
5. Unscrew the 10 mm Fuel Pipe Union. |
|
|
|
6. Unscrew the 15 mm Carburettor Manifold Union and remove the Carburettor complete with cable. |
|
|
|
7. Unscrew and remove the brass Main Jet with a 9 mm ring spanner. For a 7 mm diameter Carburettor Venturi Diameter the mixture will be weaker and the Main Jet hole will require enlargening (from 0.48 mm to 0.5 mm equivalent to a 31 Main Jet) with a 0.5 mm drill held in a miniature drill chuck available from a model shop or Maplins Electronics who stock a Microbox Metric Set (20 drills from 0.3 mm to 1.6 mm, Stock Code: GU87U). The drill must be turned VERY CAREFULLY forwards and backwards by hand, half a turn at a time, otherwise the drill WILL break off in the jet. After drilling clean thoroughly with Carburettor Cleaner Spray making sure that the hole is perfectly clear. Do NOT screw the Main Jet back in yet. |
|
|
|
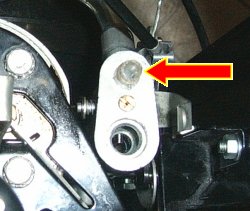
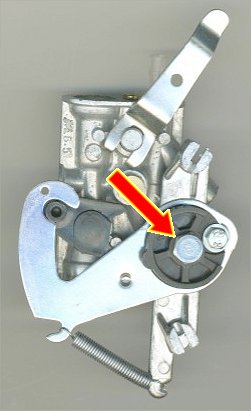
8. Unscrew the 10 mm Bolt shown and remove the Return Spring and Throttle Cable Assembly complete with cable but keep the bolt inside the assembly to prevent the throttle cable from unwinding. |
|
|
|
9. Remove the black plastic and aluminium Throttle Collar. The Throttle Collar does NOT need to be drilled as it already has a hole diameter of 7 mm. |
|
|
|
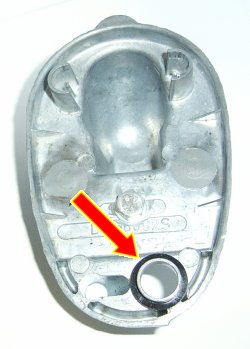
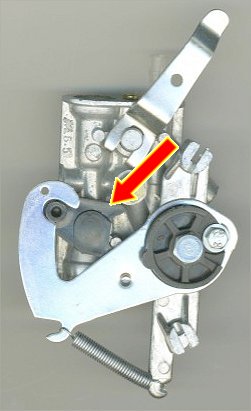
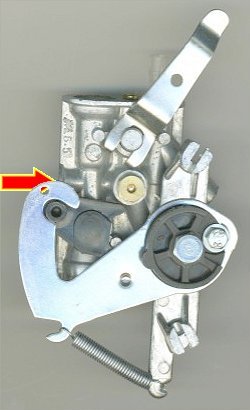
10. Drill out the Lead (Pb) Blanking Plug using a 3.5 mm diameter drill in the side of the Carburettor. To be safe, use a drill held inside a drill chuck and turn chuck slowly by hand. Take care not to drill into the Dispersion Jet on the inside of the Venturi. |
|
|
|
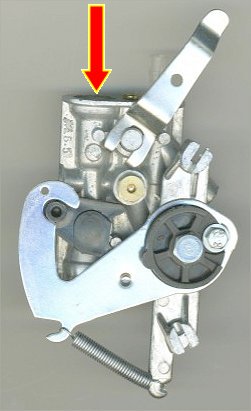
11. Drill out the Venturi hole using a 7 mm diameter drill from the top of the Carburettor. To be safe, use a drill held inside a drill chuck and turn chuck slowly by hand. Using a 2 mm drill between the fingertips, make a slight internal chamfer in the end of the Dispersion Jet and then pass a 1.2 mm drill through the hole to clear it. Force Carburettor Cleaner Spray through all the jets and holes in the carburettor to make sure that they are perfectly clear and carefully check that all drilling swarf is removed. |
|
|
|
|
12. Wrap Electrician's Insulating Tape over the end of a 6 mm drill so that the adhesive side is outermost. Insert both drill and tape carefully into the Venturi and press the tape against the inside of the Venturi using the drill so that the Lead Blanking Plug hole is sealed. Turn the carburettor on its side and fill the hole with Epoxy Resin (fuel resistant). When the Epoxy Resin has hardened fully, carefully remove both drill and tape then re-assemble Carburettor. |


|
The calculator below calculates the ideal Carburettor Venturi Diameter given Cubic Capacity (cm³), Maximum Speed (RPM) and Maximum Air Speed (m/sec). You may enter your own values in the yellow boxes below: |
![]()
VELOSOLEX is a trademark of VELOSOLEX
AMERICA, LLC
e-SOLEX, SOLEX and SOLEXINE
are trademarks of Societie SINBAR
- Groupe CIBLE